Welcome to NewGenEducationApp!
Hi! This guide wants to give you a very rapid introduction about how you can signup & configurate your Institute in NewGenEducationApp.
Institute Free Signup
By clicking the "Signup for free" button, Institute can create a free account within minutes. No card details or payments required.
Getting your Account details
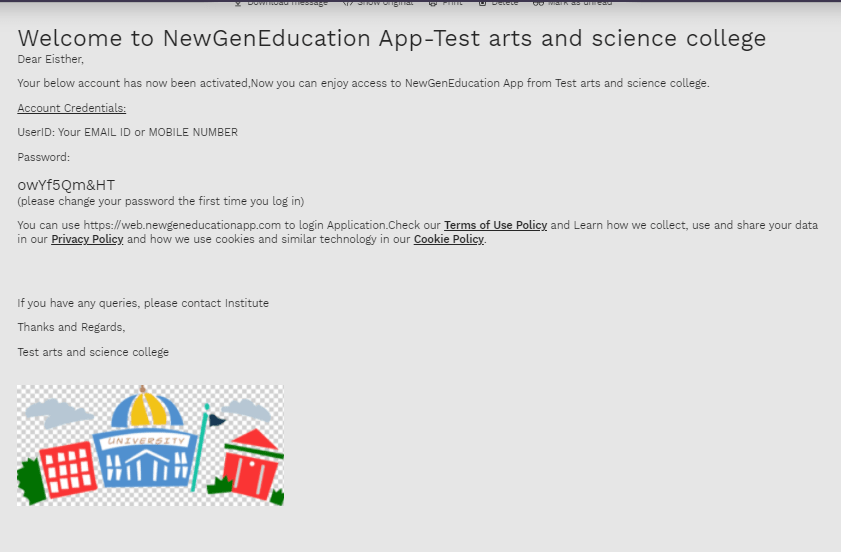
After successful completion of signup process, the person who signed up receives the application login credentials via email.
You can login into application
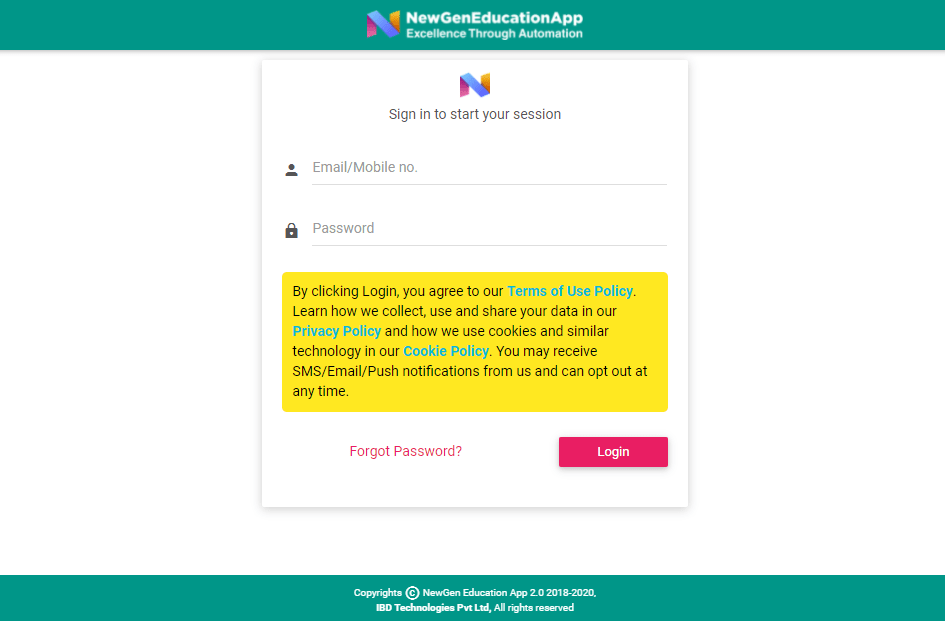
The person who signed up can Login into the application through either website or mobile app. For web access, web.newgeneducationapp.com can be used. For mobile access, you can download our mobile app from App Store & Play Store.
General Configuration
Configure your institute's general configurations such as Institute name, logo, subjects offered, etc.
Academic Year Configuration
Configure the starting and ending dates of the current academic year.
User creation - Teacher & Other staffs
Create profiles for the teachers & other staffs. Login credentials will be sent automatically to the created staffs through mail. They can use this credential and use NewGenEducationApp as Staff users.
Class configuration
Create & configure all the classes in your institute.
Holiday maintenance
Mention the set of holidays in this current academic year.
Timetable
Once all the classes are created, configure the timetable for the classes.
Student Profile
Create student profile for all the students in the institute. Once the profile is created, the student/parent user will receive a mail with the login credentials to access NewGenEducationApp as Student/Parent users.
Student Register
Once the student profiles are created, you can add/link the students with the class's student register.
Other Details
Now your institute is ready for its daily transactions. You can perform day-to-day activities such as attendance, lesson planners, notes, blogs, etc.
Refer below for step-by-step detailed instructions of the above mentioned signup & configuration operations.
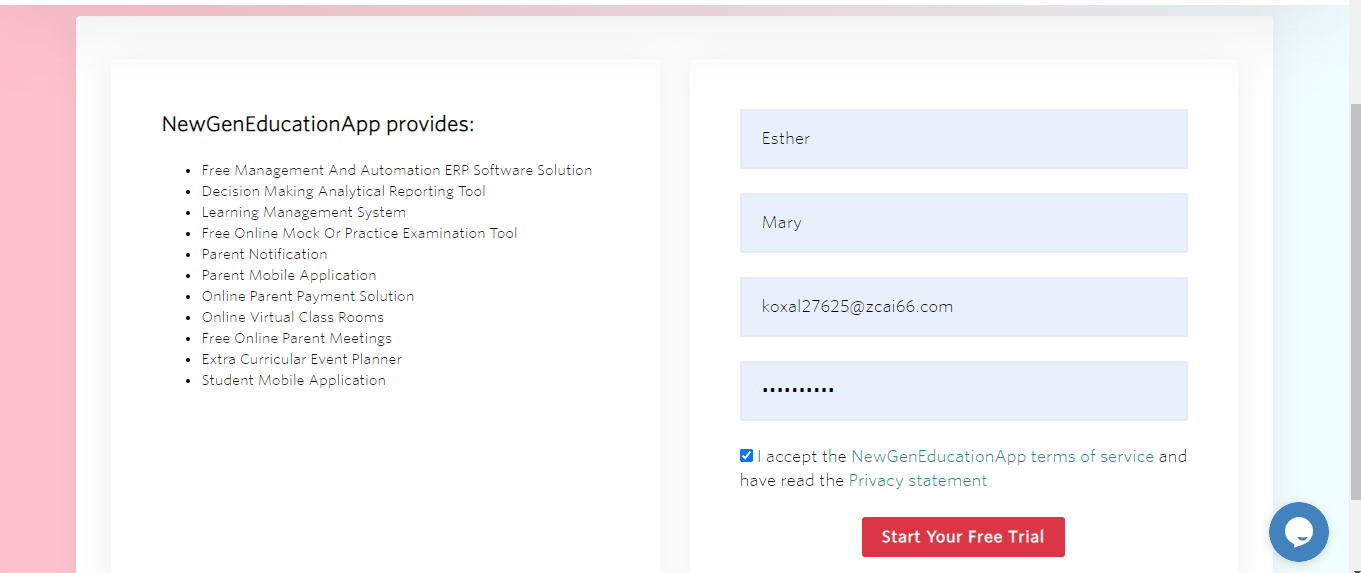
Step 1: Institute Free Signup
You can create a free account with which you can access the features of NewGenEducationApp. No card details or payment information required to create an account.
- Go to Signup page.
- Provide general details:
- Mention the First name, Last name, Email ID & Password.
- Accept the terms of service.
- Click "Start Your Signup for free" button.
- Email verification:
- A mail will be sent to the provided email ID.
- Click at the link given at the mail, or copy paste the link in browser.
- In case no mail is received, then you can request to resend the mail by clicking the "Resend Email" button.
- Phone number verification:
- Choose the country you live in, at the dropdown menu.
- Mention your phone number.
- Click "Verify". A verification code will be sent to the given number.
- Type the verification code & click "Submit".
- In case no SMS is received, wait till the counter ends. Then click "Resend code" button.
- Provide details about your Institute:
- Pick the 'Institute type' which better suits your Institute.
- Mention the number of Student in the Institute.
- Select the required features.
- Mention the Institute mail ID from which the parent mail notifications will be sent.
- Mention the address of your Institute.
- Mention the Country at which your Institute is located at.
- Mention the local language spoken in the geographical area where your Institute is located.
- Mention the currency which is used to handle transactions in your Institute.
- Mention the Time Zone at which your Institute is located at.
- Personalise your Institute & admin user:
- Mention the Institute Name and its logo.
- Mention the name for admin user.
- By default, system will provide an auto-generated Employee/Staff ID for admin which can be used. If the institute wants to assign their own Staff ID for admin, then that ID can be entered.
- Mention educational qualification of admin user.
- Mention the date of birth of admin user.
- Mention the gender of admin user.
- Click 'Save' button
Step 2: Getting your Account details
Once your Institute signup application is verified and accepted, you (admin user) will be notified with a mail that contains login credentials.
Step 3: Admin will login into application
As mentioned in step-3, admin user will get login credentials through mail. NewGenEducationApp can be accessed through either web site or mobile app. For web access, web.newgeneducationapp.com can be used. For mobile access, you can download our mobile app from App Store & Play Store.
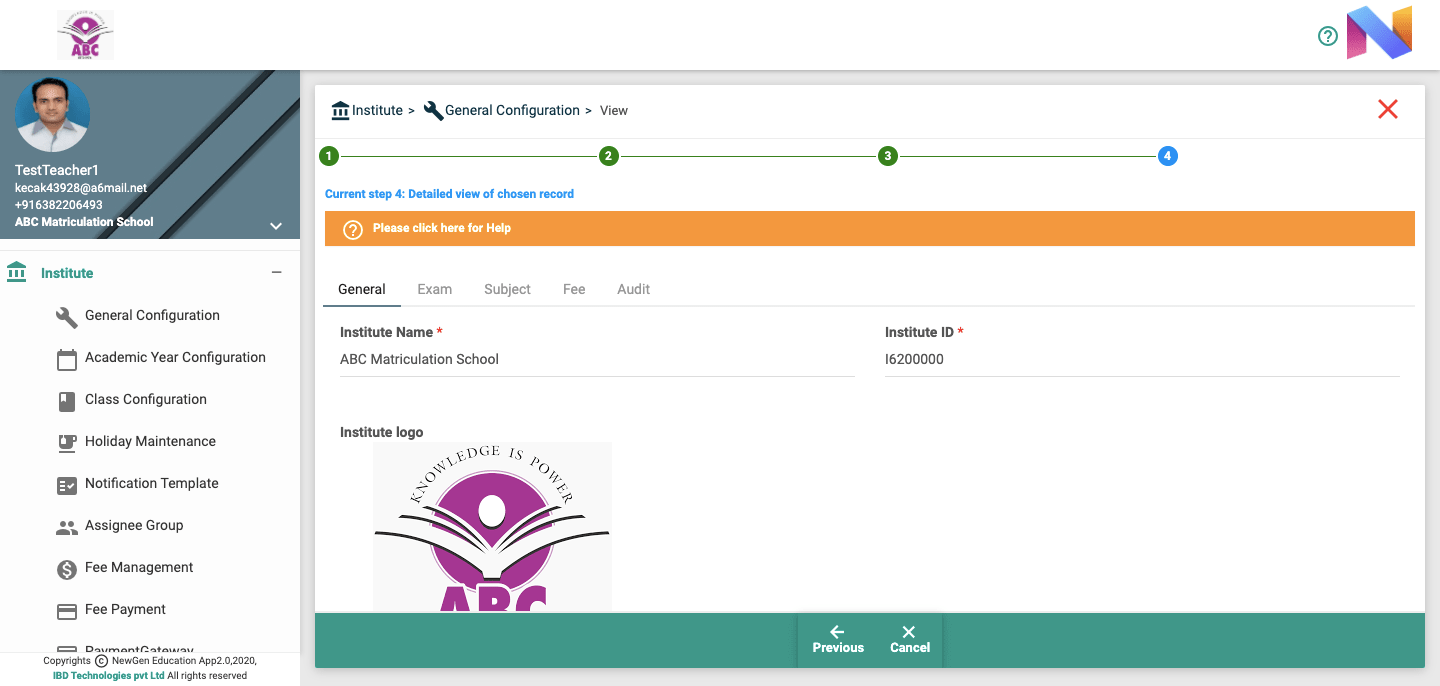
Step 4: General Configuration
Once the admin login into the system (refer step-4) they can configure exams conducted & subjects handled in the Institute by following the below steps:
- Login to NewGenEducationApp.
- Click Institute -> General Configuration, in the menu tree.
- Click 'Edit'.
- Configuring exams:
- Click 'Exam' tab.
- By default, Term1 & Term2 exams will be created. You can remove them by clicking the minus button on the right side of the screen.
- Click plus button on the right side of the screen to add new exam. Mention all the exams conducted in your Institute.
- Mention the exam code, description in English & in local language for each exam.
- Configuring Subjects:
- Click 'Subject' tab.
- By default, Science & Mathematics will be created. You can remove them by clicking the minus button on the right side of the screen.
- Click plus button on the right side of the screen to add new subject. Mention all the subjects handled in your Institute.
- Mention the ID, Name in English & in local language for each subject.
- Click 'Next' button at the bottom of the screen.
- Mention any remarks if you want. The remarks entered here can be seen at 'maker remarks' under audit tab, while viewing.
- Click 'Save' button at the bottom of the screen.
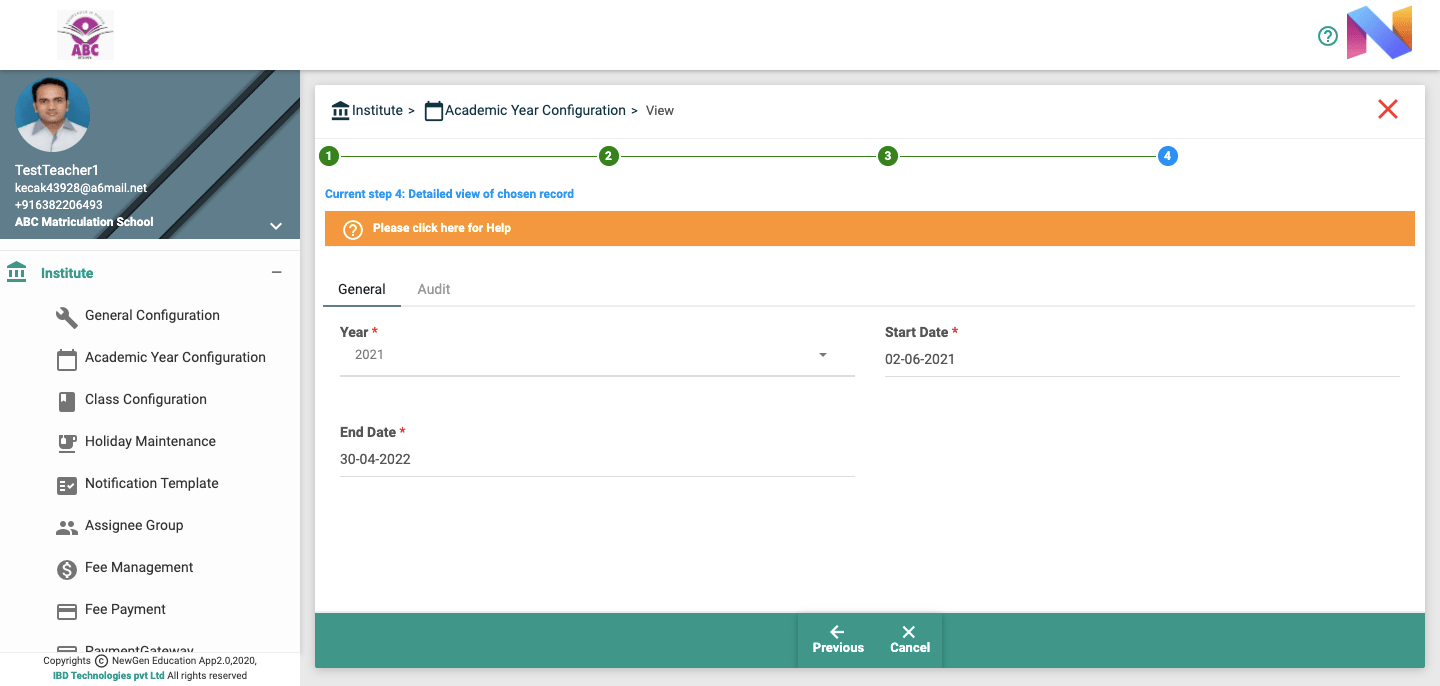
Step 5: Academic Year Configuration
After the general configuration are completed (as mentioned in step-5) Institute admin user should configure its Academic Year. In academic year configuration, the start and end date of the Institute for a specific academic year is configured.
- Login to NewGenEducationApp.
- Click Institute -> Academic Year Configuration, in the menu tree.
- Click 'Create'.
- Enter the academic year at 'Year' field.
- Enter the date in which the institute is about to be reopened for the given academic year at 'start date' field.
- Enter the date in which the Institute is about to be closed for the given academic year at the 'end date' field.
- Click 'Next' button at the bottom of the screen.
- Mention any remarks if you want. The remarks entered here can be seen at 'maker remarks' under audit tab, while viewing.
- Click 'Save' button at the bottom of the screen.
Refer user manual for more details.
Step 6: User creation - Teacher & Other staffs
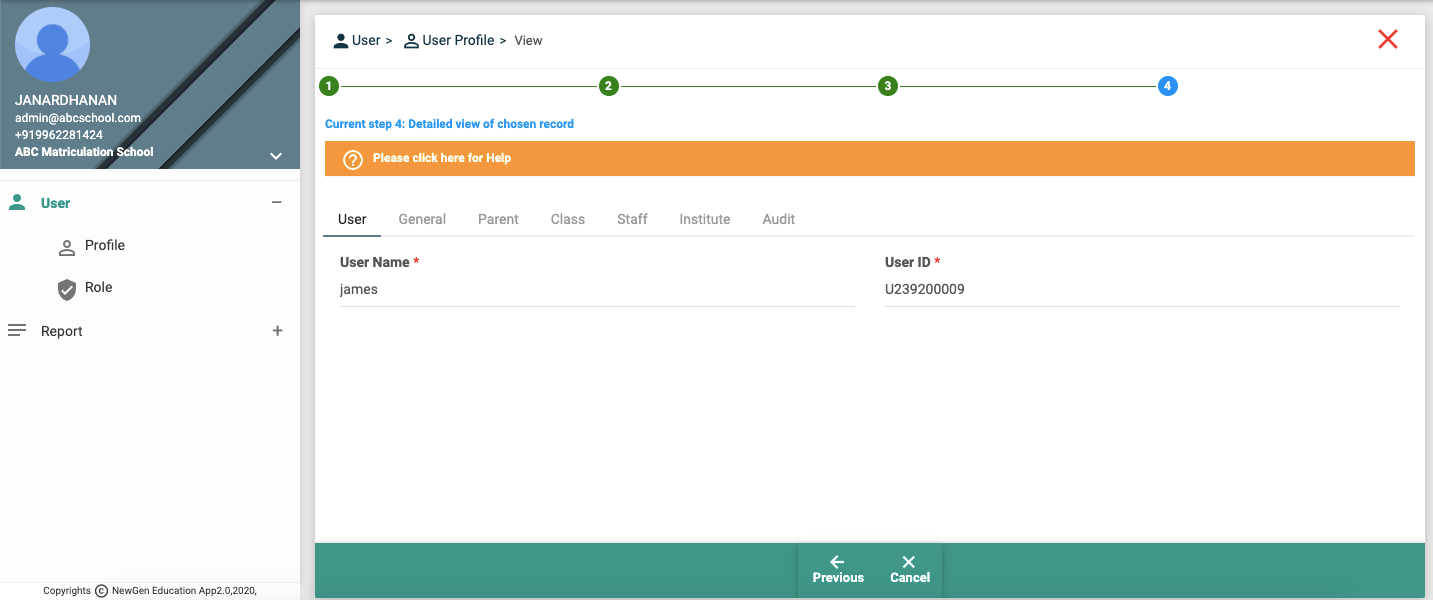
Once the above steps are completed, now the Institute admin user has to create accounts / profiles for the working staffs (either teacher or other staffs) in the Institute.
Each staff created in the Institute can access NewGenEducationApp after their account / profile is verified (or Authorized).
A mail with staff login credentials will be sent to the created staff's mail ID. Staff users can access NewGenEducationApp using this login.
- Login to NewGenEducationApp.
- Click Staff -> Profile, in the menu tree.
- Click 'Create'.
- Provide general staff details:
- Mention the name of the staff.
- By default, system will provide an auto-generated Staff ID that can be used. If the institute admin user wants to assign their own staff ID, then that ID can be entered replacing the auto-generated ID.
- Mention the type or the role of the staff. Each type has its own set of functionalities:
- Management/Admin:
- Admin users can access all the classes and teachers.
- If admin user is creating any instance (like staff profile, event, assignment, etc.) they are authorized immediately.
- Teacher & other staff:
- Teachers and other staffs have limited access. The roles and available access of them can be viewed at 'Menu tree'.
- By default teachers and other staffs do not have automatic authorize feature, unlike admin users. But it could be granted (by admin) at corresponding user profiles.
- Management/Admin:
- You could also upload the staff photo. Click 'choose file' to upload a profile picture of the staff. Files with the extensions: .jpg .jpeg .png can be uploaded.
- Click 'Next' at the bottom of the screen.
- Provide Educational details:
- Mention the education qualification of the staff.
- Mention the Date of Birth of the staff.
- Mention the Gender of the staff.
- If you want to add a note on this staff, then mention that in the field 'Note'.
- Click 'Next' at the bottom of the screen.
- Mention the address of the staff.
- Click 'Next' at the bottom of the screen.
- Mention the family details of the staff:
- Mention the name of the relative.
- Mention the relationship between the staff and this relative.
- You could also upload photo of the relative. Click 'choose file' to upload the picture. Files with the extensions: .jpg .jpeg .png can be uploaded.
- Mention the occupation of the relative.
- Mention the Email address of the relative.
- Mention the contact number on the relative.
- Click 'Next' at the bottom of the screen.
- Provide contact & medical details:
- Mention the contact number of the staff.
- Mention the Email address of the staff.
- Mention the blood group of the staff.
- Enter existing medical details, if exist.
- Click 'Next' at the bottom of the screen.
- Mention any remarks if you want. The remarks entered here can be seen at 'maker remarks' under audit tab, while viewing.
- Click 'Save' button at the bottom of the screen.
Refer user manual for more details.
Step 7: Class configuration
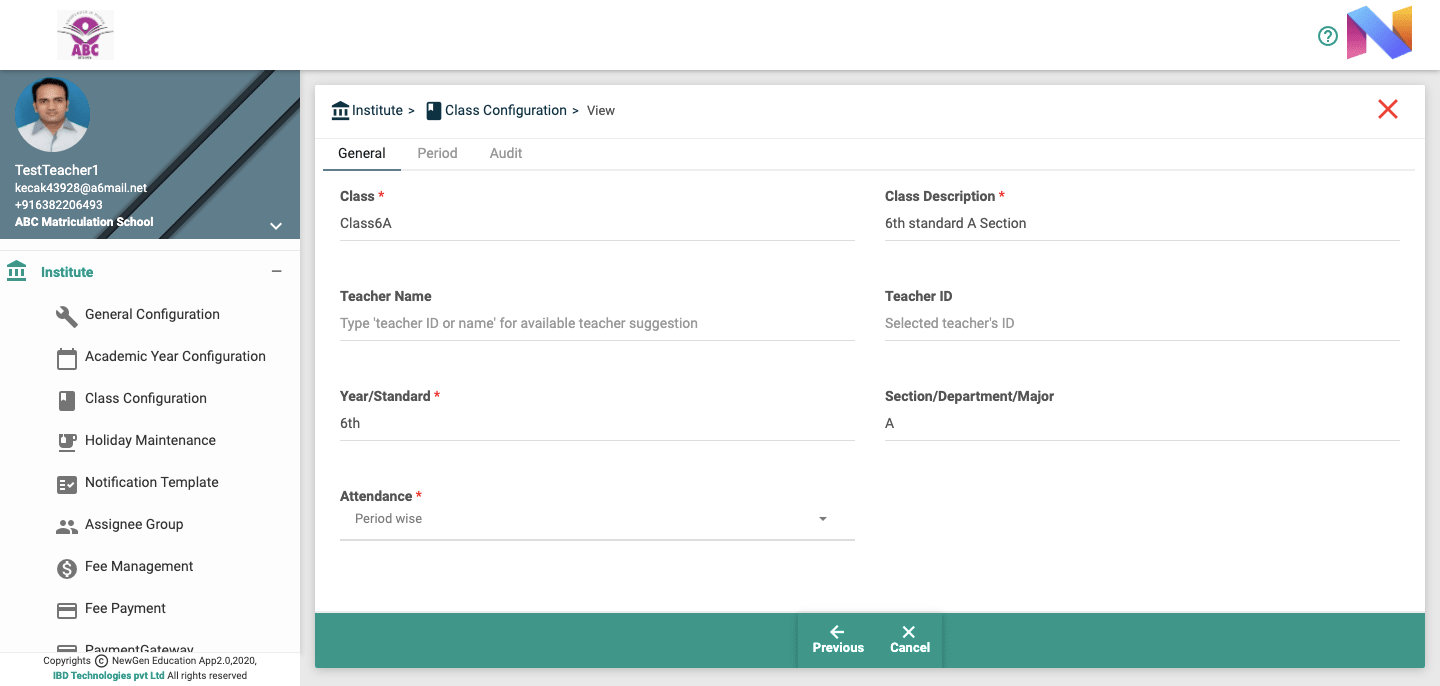
Class configuration comprises of the configuration of class code, year/standard, department/section/major, Coordinator of the class, Attendance type & period details.
- Login to NewGenEducationApp.
- Click Institute -> Class Configuration, in the menu tree.
- Click 'Create'.
- Provide general Class details:
- Mention the name of the class.
- Mention the description of the class.
- Mention the Teacher who is the Coordinator of the class. You can type teacher name or ID to show suggestion of available teachers. Double click from the list to select that teacher.
- Mention the year / standard for the class.
- Mention the Section / Department / Major for the class.
- Choose an attendance type for the class. There are 3 different types of attendance that can be followed:
- Period wise: Attendance is taken for each period.
- Day wise: Attendance is taken only once a day.
- Noon wise: Attendance is taken once for forenoon & afternoon.
- Provide period details:
- Mention the period number.
- Mention starting and ending time for the period.
- Mention the noon at which this period belongs to.
- Press '+' (plus) button to add a period.
- You could also remove a period, by clicking the '-' (minus) button.
- Once all the periods are entered, click 'Next' at the bottom of the screen.
- Mention any remarks if you want. The remarks entered here can be seen at 'maker remarks' under audit tab, while viewing.
- Click 'Save' button at the bottom of the screen.
Refer user manual for more details.
Step 8: Holiday maintenance
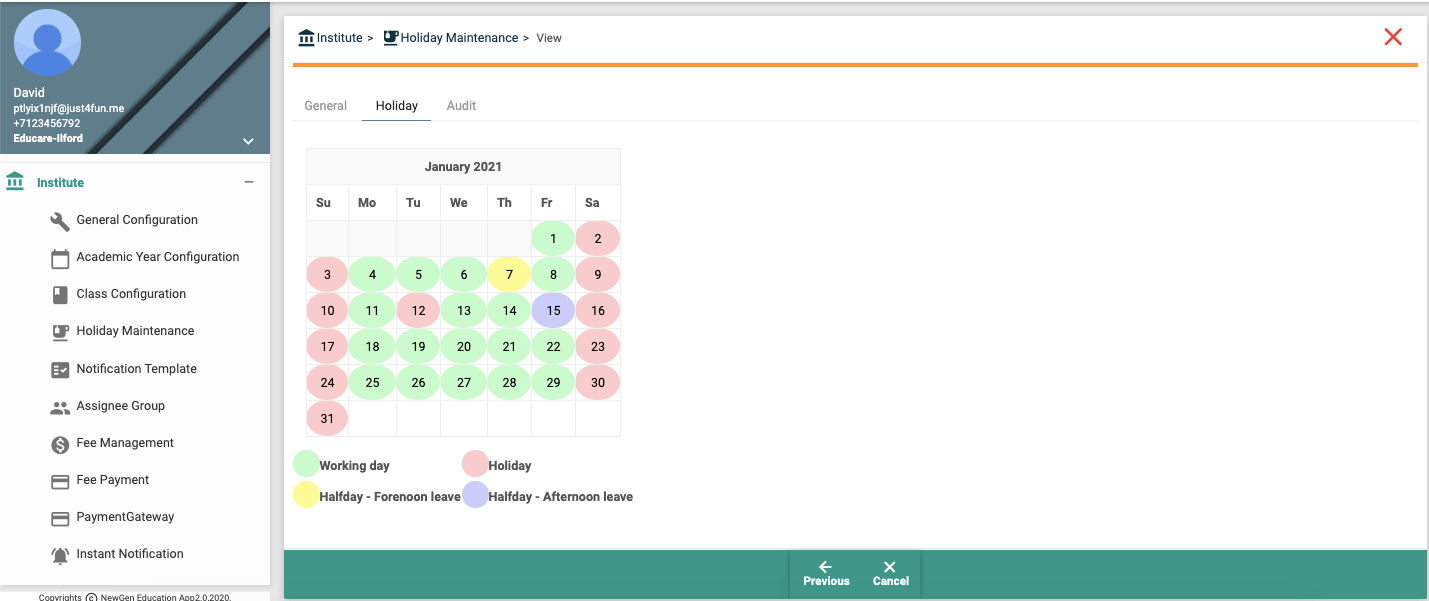
Here the set of working and non-working days can be set for given classes.
- Login to NewGenEducationApp.
- Click Institute -> Holiday Maintenance, in the menu tree.
- Click 'Create'.
- Enter month and year, for which the holiday is to be maintained.
- To apply the holiday for all the classes in the Institute, mention 'ALL' in the class code. When a class follows specific holiday structure, then that class code can be mentioned in the class field. To mention class code, Type class code / description / year / section to show suggestion of available classes. Double click from the list to select the class.
- By default, the system will regard all weekends (Saturday & Sunday) as holidays.
- Click at the date to toggle the statuses below:
- Working day (represented by colour: green)
- Holiday (represented by colour: pink)
- Forenoon working day (represented by colour: yellow)
- Afternoon working day (represented by colour: blue)
- Once the holidays and working are set as required, Click 'Next' button at the bottom of the screen.
- Mention any remarks if you want. The remarks entered here can be seen at 'maker remarks' under audit tab, while viewing.
- Click 'Save' button at the bottom of the screen.
Refer user manual for more details.
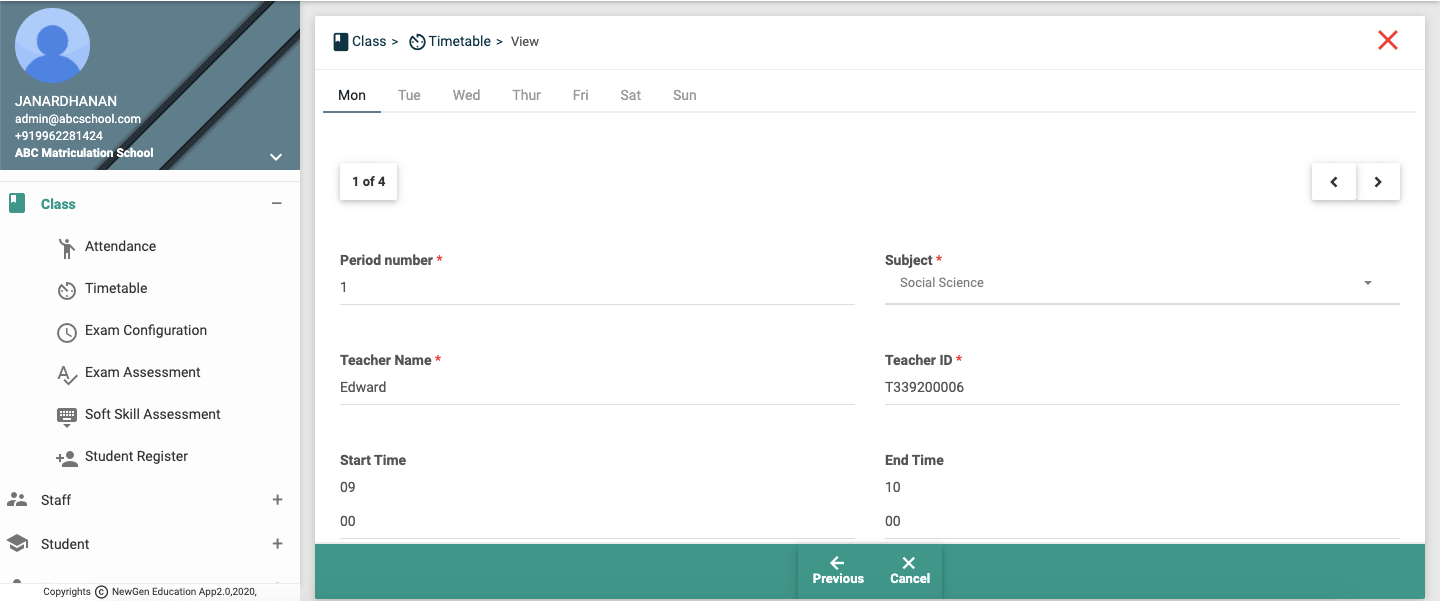
Step 9: Timetable
When all the required classes are created (as mentioned in step-8), timetable for those classes should be configured.
- Login to NewGenEducationApp.
- Click Class -> Timetable, in the menu tree.
- Click 'Create'.
- Mention the class to which the timetable is to be created. Type class code / description / year / section to show suggestion of available classes. Double click from the list to select the class.
- Click 'Next' at the bottom of the screen.
- Enter timetable:
- Each tab ('Mon', 'Tue', ... ,'Sun') represents each day of the week.
- Mention the corresponding subject in the dropdown menu at 'Subject' field.
- Mention the teacher responsible for that period. You can type teacher name or ID to show suggestion of available teachers. Double click from the list to select that teacher.
- Once the timetable is entered for all the required periods, click 'Next' at the bottom of the screen.
- Mention any remarks if you want. The remarks entered here can be seen at 'maker remarks' under audit tab, while viewing.
- Click 'Save' button at the bottom of the screen.
Refer user manual for more details.
Step 10: Student Profile
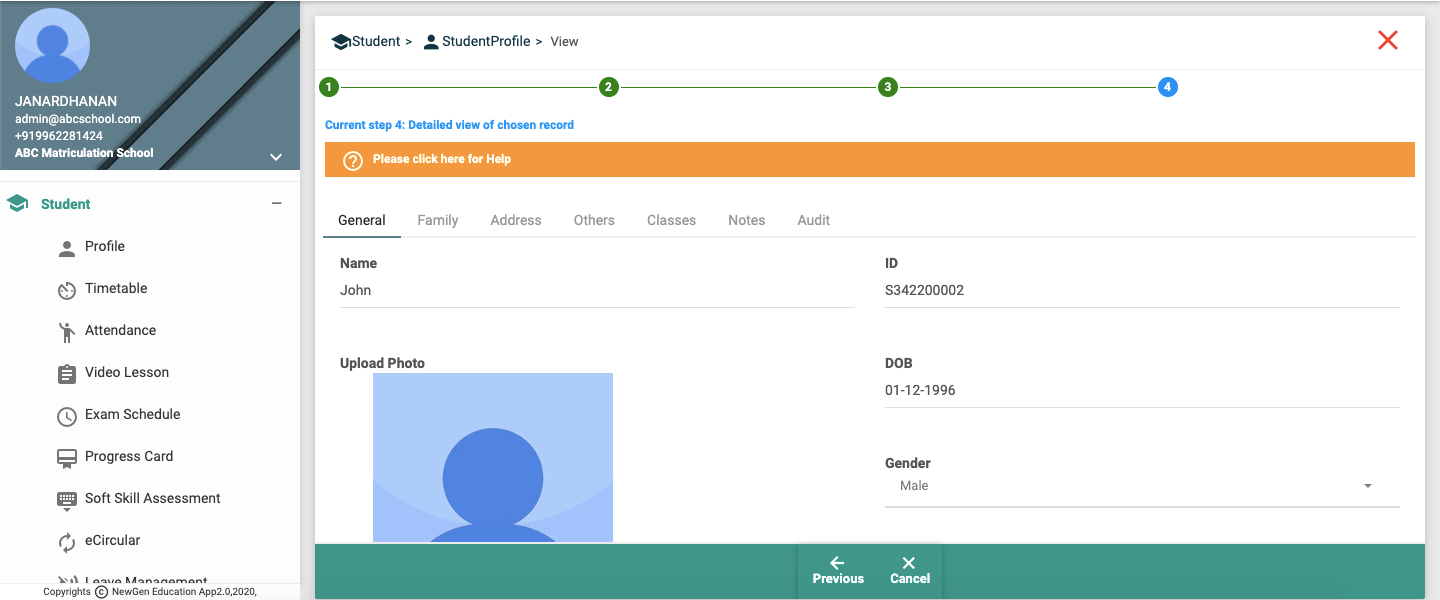
Create a profile for each student in the Institute.
If the Institute has opted for the 'Student access to the application' feature,
then once the profile of the student is verified, they will receive the login credentials in mail, through which they can access NewGenEducationApp.
If the Institute has opted for the 'Parent access to the application' feature,
then once the profile of the student is verified, Parent of the student will receive the login credentials in their mail, through which they can access NewGenEducationApp.
If the Institute has opted for the Base plan (No student & Parent access to the application feature), then there will be no welcome mails sent to parent or student.
- Login to NewGenEducationApp.
- Click Student -> Profile, in the menu tree.
- Click 'Create'.
- Provide the general student details:
- Mention the name of the student.
- By default, system will provide an auto-generated Student ID that can be used. If the institute admin user wants to assign their own Student ID, then that ID can be entered replacing the auto-generated ID.
- You could also upload the student photo. Click 'choose file' to upload a profile picture of the student. Files with the extensions: .jpg .jpeg .png can be uploaded.
- Mention the date of birth of the student.
- Mention the gender of the student.
- If required, mention the contact number of the student.
- If required, mention the email address of the student.
- If you want to add a note on this student, then mention that in the field 'Note'.
- Provide the family details of the student:
- Mention the name of the Parent / Guardian of the student.
- Mention the relationship between the student and the relative.
- Mention the occupation of the relative.
- Mention the email address of the relative.
- Mention the contact number of the relative.
- Check whether this relative requires the notification feature. (Applies only when the Institute has subscribed for notification feature)
- Provide the preferred language for receiving notifications.
- Mention the address of the student.
- Provide medical details:
- Mention the student's national level identification number in the field 'National ID'. For example, SSN in US, Aadhar number in India.
- Mention the blood group of the student.
- Enter existing medical details, if exist.
- Click 'Next' at the bottom of the screen.
- Mention any remarks if you want. The remarks entered here can be seen at 'maker remarks' under audit tab, while viewing.
- Click 'Save' button at the bottom of the screen.
Refer user manual for more details.
Step 11: Student Register
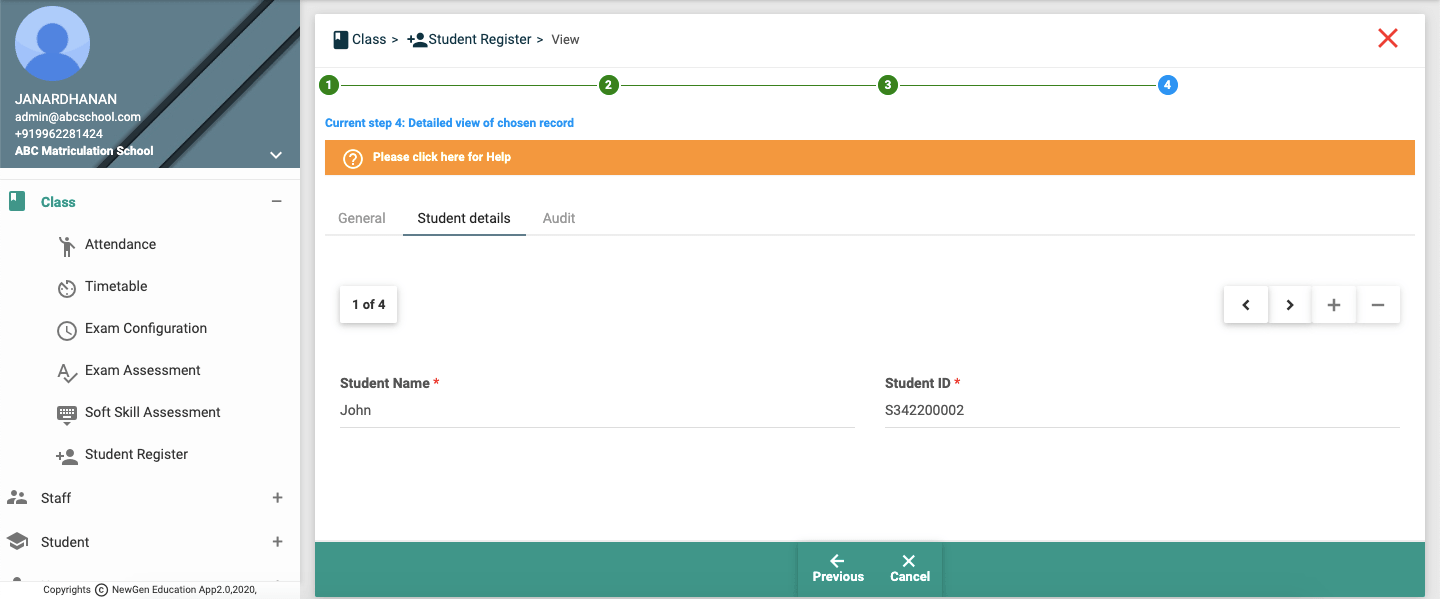
At student register a set of students are registered under a certain class for a duration of time.
- Login to NewGenEducationApp.
- Click Class -> Student Register, in the menu tree.
- Click 'Create'.
- Provide details about the class / course:
- Mention the class to which the student are to be registered. Type class code / description / year / section to show suggestion of available classes. Double click from the list to select the class.
- Mention the start and end date of the course of period for which the set of assigned students stay under the provided class.
- Mention the list of students.
- Mention the student who is about to be enrolled to the class/ course. You can type student name or ID to show suggestion of available students. Double click from the list to select that student.
- Press '+' (plus) button to add a student.
- You could also remove a student, by clicking the '-' (minus) button.
- Once all the required students are mentioned, click 'Next' at the bottom of the screen.
- Mention any remarks if you want. The remarks entered here can be seen at 'maker remarks' under audit tab, while viewing.
- Click 'Save' button at the bottom of the screen.
Refer user manual for more details.
Step 12: Other Details
Once you complete all the above steps, your Institute is now ready for its daily transactions. You can manage the fees and Payment Gateway for fee payment details. And proceed on carrying out daily transactions, such as:
- Attendance
- Video assignment
- Exam configuration
- Exam assessment, etc.
You could refer user manual for more details on how to perform each daily transactions / features.